
Let’s be real – you’ve probably tried everything under the sun to get clear skin. From that miracle cream your friend swore by (spoiler alert: it didn’t work) to spending half your paycheck at Sephora, only to wake up with more breakouts than before. Trust me, I’ve been there, staring at the mirror wondering why my skin hates me so much.
But here’s the thing – getting clear skin isn’t about finding that one magical product. It’s about understanding your skin, building the right routine, and being patient enough to let it work. Ready to finally crack the code? Let’s get into it.
Understanding Your Skin Basics
Before we jump into products and routines, you need to know what you’re working with. Think of it like cooking – you wouldn’t throw random ingredients together and expect a masterpiece, right?
The 4 Main Skin Types
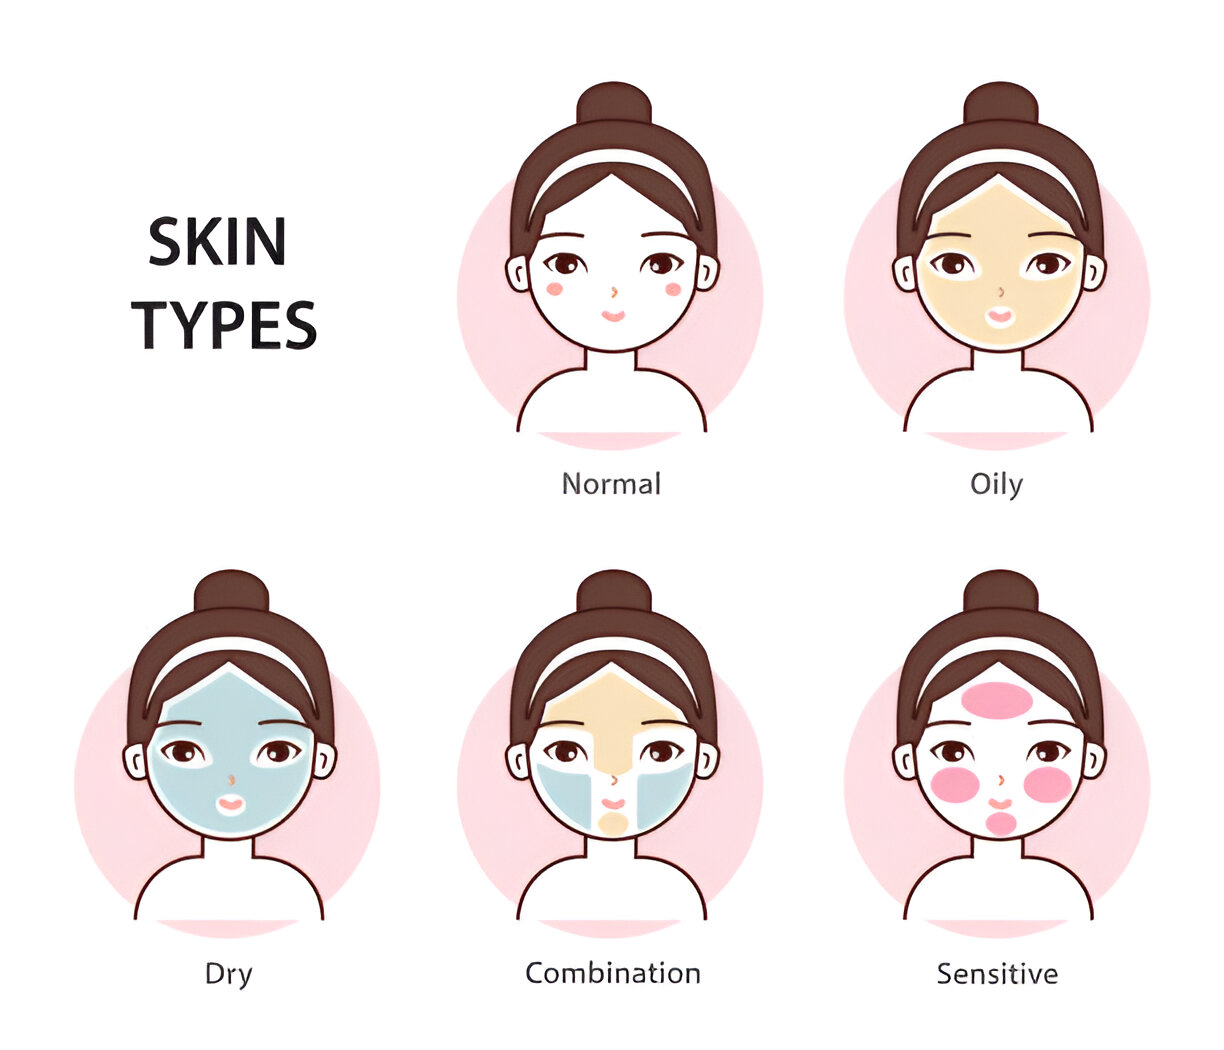
Oily skin generates extra sebum and appears glossy, especially in the T-zone. You’re undoubtedly dealing with bigger pores and frequent outbreaks.
Dry skin feels tight and seems drab. You may experience flaking or rough places, and your skin absorbs moisturizer like it’s in the desert.
Combination skin is difficult to manage since it is oily in certain areas (often the T-zone) and dry in others. It’s as if your face is indecisive.
Sensitive skin reacts to everything. New product? Breakout. Change in weather? Irritation. It’s basically the drama queen of skin types.
What’s Actually Causing Your Skin Problems?
Your skin doesn’t just randomly decide to rebel against you. Common culprits include hormones (thanks, puberty and periods), your diet (yes, that daily chocolate fix might be contributing), using the wrong products, stress, and even your lifestyle habits.
Here’s why those “one-size-fits-all” skincare routines you see everywhere don’t work – because everyone’s skin is different! What works for your bestie might turn your face into a hot mess.
Step 1: Assess Your Current Situation
Time for some honest self-reflection. Look in the mirror and really examine your skin. What’s your main concern? Acne? Dark spots? Dullness?
Advertisement
How to Identify Your Skin Type
Try the tissue test. Wash your face, wait 30 minutes, then press a clean tissue to different areas. If it comes away oily from your entire face, you have oily skin. No oil at all? Dry skin. Oil only from your T-zone? Combination. If your skin feels irritated from this simple test, you might have sensitive skin.
Take Those Before Photos
I know, I know – the last thing you want is photographic evidence of your skin struggles. But trust me on this one. Take photos in natural light from different angles. You’ll thank me later when you see how far you’ve come.
Step 2: Build Your Foundation Routine
Let’s start simple. Forget those 12-step routines you see on social media – they’re doing too much, and your skin probably hates the chaos.
Morning Routine: Keep It Simple

Advertisement
Gentle cleanser – Remove overnight buildup without stripping your skin Moisturizer – Yes, even if you have oily skin. Skipping this makes your skin produce MORE oil SPF – Non-negotiable. UV damage causes aging and can worsen acne
Evening Routine: Time to Repair
Cleanser – Remove makeup, sunscreen, and daily grime Treatment – This is where you’ll add targeted ingredients later Moisturizer – Lock in hydration while you sleep
Product Recommendations by Skin Type
Oily skin: Look for gel cleansers, lightweight moisturizers, and oil-free formulas. CeraVe Foaming Cleanser is a solid choice.
Dry skin: Cream cleansers, rich moisturizers, and hydrating ingredients like hyaluronic acid. Try Cetaphil Gentle Skin Cleanser.
Combination skin: Depending on the area, you may require various products. Begin with mild, well-balanced formulae.
Sensitive skin: Fragrance-free everything. Vanicream and La Roche-Posay are your friends.
Common Mistakes to Avoid
Stop over-cleansing (twice a day max), quit changing products every week, and for the love of clear skin, stop picking at your face!
Step 3: Address Specific Skin Issues
Now we’re getting to the good stuff – targeted treatments that actually work.
For Acne

Salicylic acid is your best friend. It gets deep into pores and clears out the gunk. Start with 0.5-2% concentration.
Benzoyl peroxide kills acne bacteria but can be harsh. Begin with 2.5% and work your way up if needed.
The best option is retinoid, but it takes time. They avoid blocked pores and accelerate cell turnover.
For Hyperpigmentation
Vitamin C brightens and protects during the day. Look for L-ascorbic acid or magnesium ascorbyl phosphate.
Niacinamide reduces inflammation and regulates oil production. It plays well with other ingredients.
Retinoids work here too – they’re basically the Swiss Army knife of skincare.
For Sensitive Skin

Azelaic acid is mild and efficient for acne and pigmentation, making it suitable for sensitive skin.
Always try new items on your inner arm for 24 to 48 hours. Your face will appreciate it later.
Step 4: Lifestyle Factors That Matter
Plot twist – clear skin isn’t just about what you put ON your face, but what you put IN your body and how you treat it.
Diet and Hydration

That whole “chocolate causes acne” thing? It’s more complicated than that. Some people do react to dairy and high-glycemic foods, but everyone’s different. Keep a food diary if you suspect certain foods trigger your breakouts.
Water is your friend. Aim for 8 glasses a day. Your skin cells need hydration to function properly.
Sleep and Stress Management
Ever notice how you break out before big exams or important events? Stress releases hormones that trigger oil production. Get 7-9 hours of sleep and find healthy ways to manage stress. Your skin (and sanity) will improve.
Exercise and Environmental Factors

Working out is great for circulation and stress relief, but shower immediately after to prevent clogged pores.
Change your pillowcase weekly – it’s basically a bacteria breeding ground. Clean your phone screen daily (seriously, when’s the last time you did this?).
Step 5: Timeline and Expectations
![]()
Here’s where I need to be brutally honest with you – clear skin takes time. Anyone selling you a “7-day miracle” is probably lying.
Week 1-2: The Adjustment Period
Your skin might freak out a little. This is normal! You might see some initial improvement in texture, but don’t expect dramatic changes yet.
Month 1: Early Improvements
You should start seeing some positive changes – less oiliness, fewer new breakouts, or improved texture. Existing blemishes might still be hanging around, and that’s okay.
Month 2-3: Real Results
This is when the magic occurs. Your skin should appear noticeably cleaner, brighter, and more even. If you aren’t seeing results by month three, it’s time to reconsider your regimen.
Troubleshooting Typical Issues
“My Skin Got Worse Before It Got Better”
This might be purging, particularly if you’re utilizing acids or retinoids as active components. Underlying congestion is being brought to the surface by your skin. Purging normally occurs in the regions where you regularly break out and lasts four to six weeks.
Purging vs. Breakouts
Purging happens where you normally get acne and resolves faster. New breakouts in unusual areas or persistent worsening after 6 weeks means the product isn’t right for you.
When to See a Dermatologist
If you have severe cystic acne, your routine isn’t working after 3 months, or you’re dealing with scarring, it’s time to call in the professionals. There’s no shame in getting expert help – sometimes you need prescription treatments.
Maintaining Your Clear Skin
![]()
Congratulations! You’ve achieved clearer skin. Now what?
Long-term Normative Modifications
Hormones, seasons, and age all affect your skin. What was effective at age 20 might not be so at age 30. Remain adaptable and change your routine as necessary.
Seasonal Changes
Your skin needs different things in summer vs. winter. You might need a heavier moisturizer in cold weather or a stronger SPF during beach season.
Prevention Strategies
Consistency is key. Don’t abandon your routine the moment your skin clears up. Think of it like brushing your teeth – it’s maintenance, not a temporary fix.
Key Takeaways
Getting clear skin isn’t rocket science, but it does require patience and consistency. Understand your skin type, build a simple routine, address specific concerns with targeted ingredients, and don’t forget about lifestyle factors.
Keep in mind that every person has different skin, so what works for one person may not work for you. Throughout the procedure, exercise patience and don’t be scared to modify your strategy in response to your skin’s reaction.
Are you ready to start your journey toward clean skin? Select skin-type-appropriate products, take those before pictures, and make a commitment to the process. Your Instagram selfies and future self will both appreciate it!
Bonus: Product Recommendations by Budget
Drugstore Heroes
- CeraVe Foaming Facial Cleanser – $15
- The Ordinary Niacinamide 10% + Zinc 1% – $6
- Neutrogena Ultra Sheer Dry-Touch Sunscreen – $8
- Cetaphil Daily Moisturizer– $14
Mid-Range Must-Haves
- Paula’s Choice 2% BHA Liquid Exfoliant – $37
- Neutrogena Rapid Wrinkle Repair Retinol Eye Cream for Dark Circles– $22
- La Roche-Posay Toleriane Double Repair Face Moisturizer – $24
Splurge-Worthy
- SkinCeuticals CE Ferulic Vitamin C Serum – $20
- Drunk Elephant T.L.C. Sukari Babyfacial – $117
- Sunday Riley Luna Sleeping Night Oil – $55
Just so you know, you can achieve fantastic outcomes without spending a fortune. As you discover what your skin likes, start with basic drugstore items and progress to more specialized ones!